Knobs
Drag vertically to change a value. Hold Shift for finer movement. The mouse wheel and arrow keys also change the focused control.
USER GUIDE · CHICKEN EQ
Thank you for choosing the world’s most chicken-shaped free dynamic EQ plug-in.
Chicken EQ is a zero-latency equalizer for cleaning resonances, shaping tone and adding a final top-end lift. Tenderizer works first, six cut-first radial bands handle broad or precise moves, and Pop Top completes the signal path.
Covers the standalone CLAP, VST3 and Audio Unit plug-in.
FIRST INSERT
Insert the plug-in on a mono or stereo track. A fresh instance opens flat, with the complete path available and reported latency at 0 samples.
Use Input Trim when the incoming level needs correction. Leave comfortable headroom for any later boost.
Turn on Tenderizer, raise Tender until protruding resonances settle, then use Focus to make each cut broader or tighter. Hold Listen to hear the removed part.
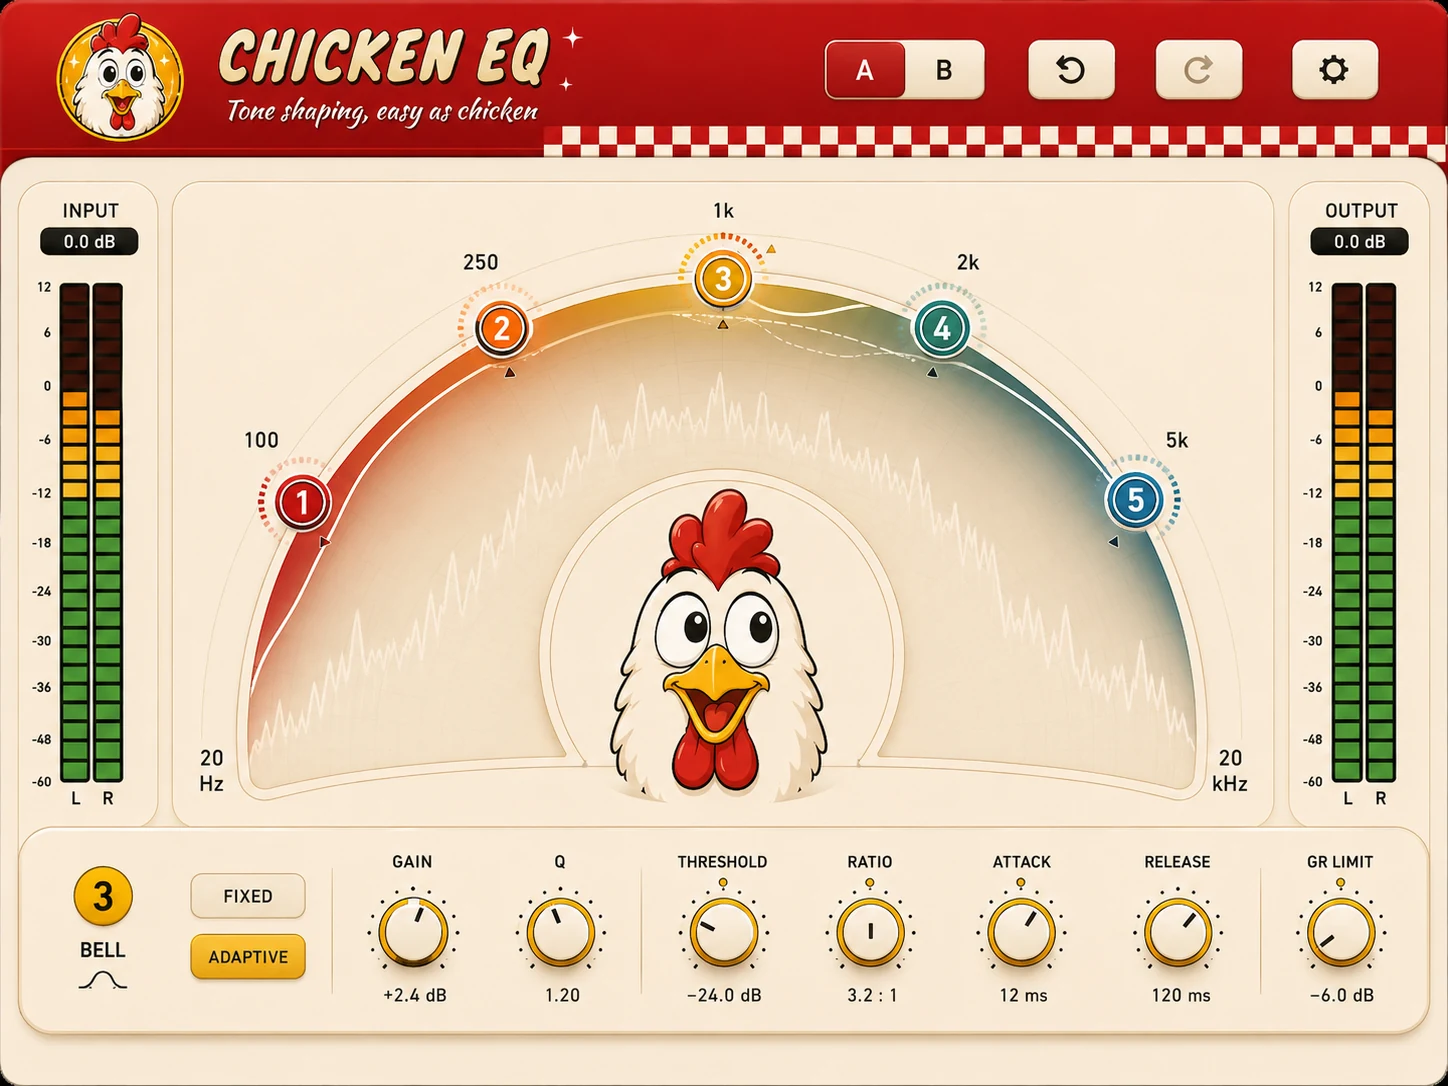
Double-click the arc to add a band, or select one of the six, then drag its node. Angle follows frequency. Distance sets gain: inward cuts, while the outer zone provides up to 3 dB of regular lift.
Use Pop Top for the final high-frequency lift, set Output Trim, then compare complete sounds with A/B at a matched listening level.
PANEL OPERATION
Drag vertically to change a value. Hold Shift for finer movement. The mouse wheel and arrow keys also change the focused control.
Click a dial and type a number, or press Return to edit the value shown. Return applies it and Escape leaves the value as it was. One click opens a band's frequency the same way, to type it in hertz, in kilohertz or as a note such as A4.
Double-click a parameter control, or press Home while it is focused, to restore its default.
Each processing stage has its own power control. This makes it practical to judge one part of the chain while the rest of the sound stays in place.
RESONANCE CONTROL
Hold Listen to hear the part Tenderizer is taking away, lifted close to the level of your mix. Ringing tones mean it has found resonances. When the body of the music comes through, lower Tender or turn Focus toward Narrow.
Release Listen to return to the complete output. Listen is an audition control, so it is best used briefly while making a decision.
SIX RADIAL BANDS
Double-click an empty point on the arc to add a band there. A single click on the arc clears the selection. The fan spans 20 Hz through 20 kHz. Pull a node inward for cut, or move it into the narrow outer lift zone for regular boost up to 3 dB.
Right-click a node to change its shape, rest it or delete it. Delete or Backspace removes the selected band.
Bell and Notch cover focused work. Low Shelf and High Shelf tilt the ends. High-Pass and Low-Pass remove material beyond their frequency. The control shelf follows the selected shape.
Q changes the width of a bell or notch and appears where the chosen shape supports it. A narrow setting isolates a small region. A broad setting moves more of the sound. With a band selected, the ] and [ keys step its Q, N switches to a narrow Q of 12 and back, and the two small ticks either side of the node set the width when dragged.
Slope sits where Q would on a High-Pass or Low-Pass band. It sets how steeply the band removes material beyond its frequency, in steps of 12 dB per octave up to 48.
Mute rests the selected band: it stops sounding and keeps its settings. Option-click a node, or press M, to rest or wake it.
Fixed mode applies the drawn filter continuously. Use it for steady tonal balance, deliberate cuts and pass filtering.
Adaptive mode keeps the fixed curve and adds downward movement when the chosen region crosses its threshold. Switched on while music plays, a band whose threshold you have not set starts it where that region sits on the louder moments, so the band moves from the first press. Threshold and Ratio set the response, and a dot on the Threshold dial follows the band's level, lighting once it passes. Attack and Release shape its timing. GR Limit caps the movement.
Press F or click Find Mode. While its window is open, Chicken EQ analyses the incoming audio and numbers likely problem frequencies on the arc, each with a measured width. Tab visits them, holding A plays one exaggerated by 24 dB, and C cuts it into a free band at 6 dB. Shift+C cuts to the suggested depth. Find stays open and moves on to the next candidate. The thin trace behind the curve draws the same analysis after your EQ, so a peak Find numbers is visible there too.
Hold V, or hold Command while pressing a node, to hear that band's cut played as a 12 dB boost at the same frequency and width. Add Shift for 24 dB. Let go and the cut is exactly as you left it. Nothing is written to the project.
FINAL STAGE
Pop Top offers 10 kHz / 20 kHz / 40 kHz. Lower settings reach farther into the audible top end. Higher settings place more of the move above it.
Raise Lift toward 12 dB while listening to the upper spectrum. Pop Top follows the six-band equalizer, so judge it after the main EQ work is settled.
MIX DECISIONS
A and B hold two complete Chicken EQ sounds. Copy the current sound to the other slot, change one decision, then switch between them.
Use Undo to step back through edits and Redo to move forward again. These controls cover ordinary parameter changes made from the editor.
The processing controls are available to the host for automation. Record or draw automation using the parameter names shown by your DAW.
The plug-in saves its complete state with the host project, including both A/B sounds. Reopen the same plug-in format when moving a session between systems.
RECOVERY
Confirm that the track is routed to the output, then check Input Trim, Output Trim and the host bypass state. Review any pass filter that could remove the part of the signal you expect to hear.
Lower Threshold until the dot on its dial lights. A dot that never rises means the selected frequency is missing from the incoming signal. Check that GR Limit is above zero.
Release the mouse and any held key: A, B, V or Shift. If the host captured the pointer, click the plug-in once. Listening never changes a band's settings.
Open Bitsnacks Vending Machine and run Repair for Chicken EQ. Restart the host so it scans the restored formats.
STILL STUCK?
Include your DAW, operating system, plug-in format and the shortest sequence that reproduces the problem.